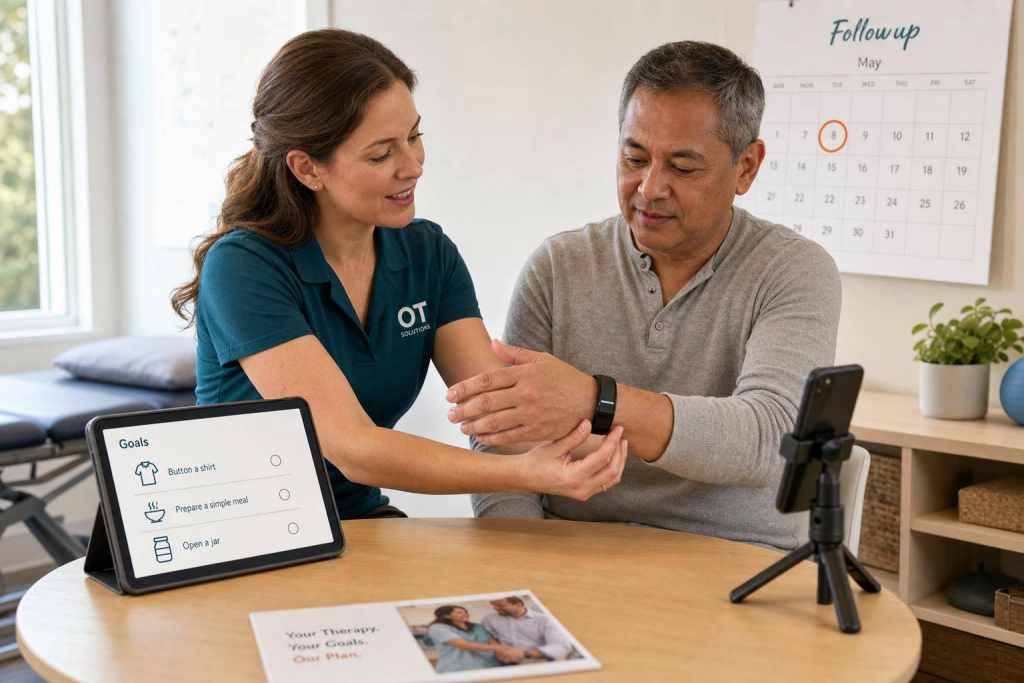
RTM fails fast when patients do not know how to use the device. In OT, good patient training means four things: pick the right patient, tie RTM to a functional goal, confirm setup with return demo, and follow up before small tech issues turn into missed data.
Here’s the short version:
- Start with fit: make sure the patient can use the device, app, and home program with or without caregiver help.
- Set one clear goal: connect RTM to daily tasks like dressing, sleep, work, lifting, or pain control.
- Train before they leave: the patient should pair the device, place it right, and send the first data point in session.
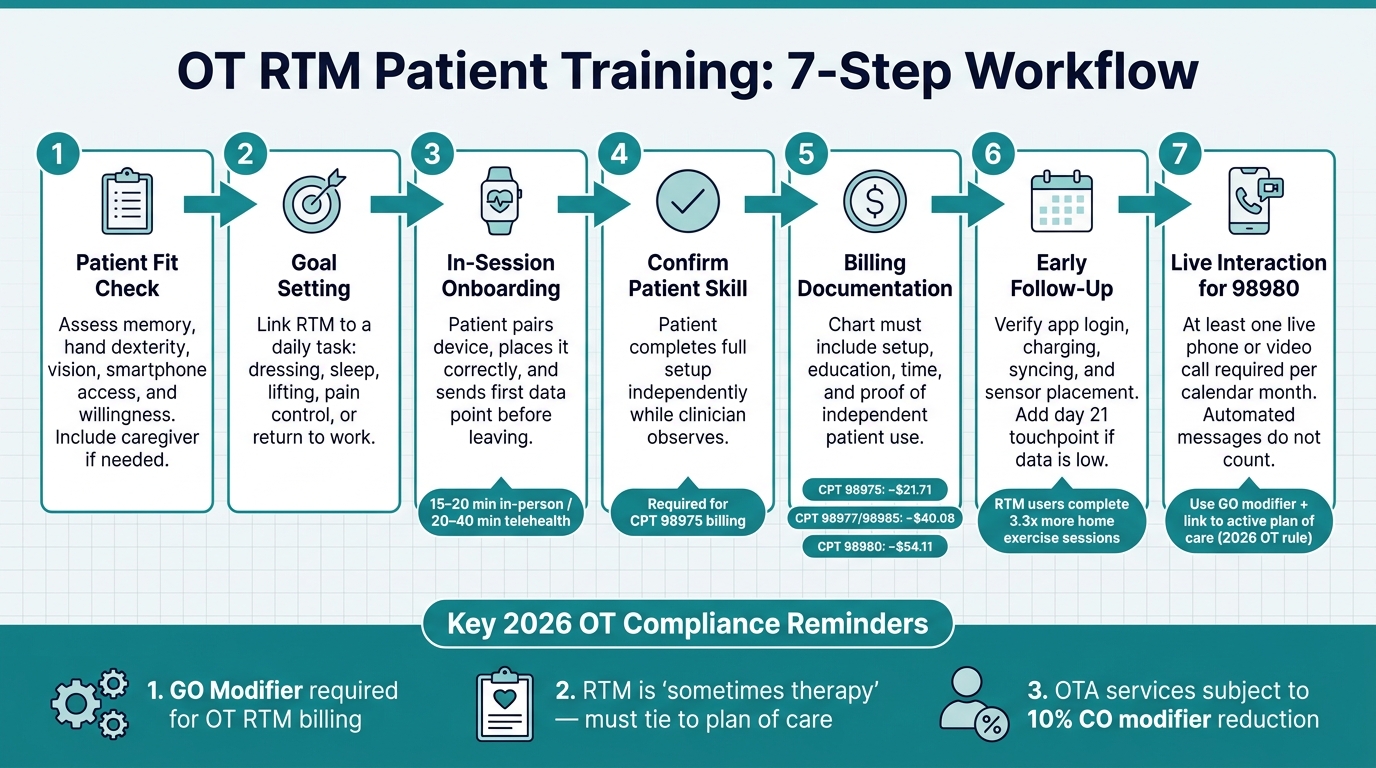
- Document for billing: for CPT 98975, the chart needs setup, education, and proof the patient can use the device on their own.
- Follow 2026 OT rules: since January 1, 2026, RTM is a “sometimes therapy” service for OT, so use the GO modifier and link it to an active plan of care.
- Check in early: a day 15 contact can help fix syncing, charging, and wear issues before the patient misses the monthly data target.
- Remember the live call rule: to bill 98980, you need at least one live phone or video visit that month.
A few numbers matter here. RTM users complete 3.3x more home exercise sessions with remote support. And in 2026, national average payment is about $21.71 for 98975, $40.08 for device supply codes like 98977/98985, and $54.11 for the first 20 minutes of management under 98980.
If I had to boil the article down to one point, it would be this: RTM training should be simple, repeatable, and tied to both function and documentation. That is what turns a wearable from a device into part of care.
OT RTM Patient Training Workflow: 7 Steps to Successful Onboarding
Remote therapeutic monitoring in action: Tools, tactics, & results
sbb-itb-44aa802
Quick Comparison
| Focus Area | What I’d do |
|---|---|
| Patient selection | Check memory, hand use, vision, phone access, and willingness |
| Goal setting | Link RTM to a task the patient wants to do better |
| First visit | Pair device, teach placement, run return demo, send first data |
| Billing setup | Document education, setup, time, and patient skill for 98975 |
| OT compliance | Add GO modifier and connect RTM to the plan of care |
| First month follow-up | Contact around day 15 and again before month end if data is low |
| Management billing | Include at least one live phone or video interaction for 98980 |
Below, I’ll walk through how to build that process in a clear way for OT practice.
How to Build an OT-Specific RTM Training Plan Before the First Session
Before the first session, get clear on three things: the patient, the goal, and the workflow. That keeps training focused and gives you a clean way to track progress.
Select the Right Patients and Set Functional Goals
Good OT RTM candidates often include patients with chronic neck or back pain, rotator cuff injury, or post-spine-surgery recovery, especially when home tracking can shape care between visits. In these cases, tracking function and symptoms outside the clinic can fill in gaps you won’t see during a short appointment.
Diagnosis matters, but daily usability matters just as much. A patient may be a good fit on paper and still struggle with the setup. Think through the basics:
- Can they remember instructions between visits?
- Do they have the hand dexterity to handle the device?
- Is their vision good enough to read app prompts?
- Do they have access to a smartphone or digital platform?
- Are they willing to use it?
If a patient needs extra help, that doesn’t automatically rule them out. It may just mean they need caregiver support for setup and daily use.
Once you’ve confirmed both clinical fit and practical fit, tie the goal to an activity the patient wants or needs to do better, like sleeping, dressing, lifting, or getting back to work. Then decide what data you’ll monitor, what alerts should trigger outreach, and when RTM should end – for example, when functional goals are met, the condition has stabilized, or non-adherence continues over time. For a musculoskeletal patient, RTM might help you spot barriers to daily function, activity spikes that make symptoms worse, or low exercise follow-through.
Support between visits can improve home exercise follow-through, so build the RTM goal around the barrier you want to change.
Once the patient and goal are set, shape the first session around those targets.
Prepare the Session, Materials, and First-Visit Targets
Before the visit, get the basics in place: plain-language instructions, consent, device access, connectivity, and a clear picture of what success should look like.
Set that success point before the visit starts. In most cases, that means the patient:
- pairs the device
- completes a return demonstration
- sets up the home program
- submits the first data point
That way, the first session isn’t just talk. The patient leaves with the system working and the first step already done.
After the setup is ready, assign roles so support stays consistent from first contact through follow-up.
Align Training With Team Roles and Documentation
Training goes more smoothly when everyone knows their part. OTs lead goal-setting and training, while OTAs and caregivers can reinforce setup and daily use under the plan of care.
Documentation should cover the device, app, education provided, patient return demonstration, and total training time. Good notes should show what the patient learned and how RTM data will shape the next steps.
How to Teach Patients to Use RTM Wearables
Set Patient Expectations in Plain Language
Once the care plan is in place, show the patient what the wearable does and how it fits into everyday life. Start with the big picture before you touch the device. Tell them it helps you see how they’re doing between visits, so you can adjust care before symptoms get worse. When patients understand the reason behind the device, they’re much more likely to keep using it.
Keep the basics simple and direct. Explain:
- what the device tracks
- how often they need to wear it
- what alerts mean
- when to call the clinic instead of trying to fix the issue on their own
Be upfront about charging and syncing too. No one likes surprises once they get home. It also helps to tie the device to something the patient cares about, like sleeping better, getting through a workday with less pain, or handling daily tasks more comfortably.
Use Demonstration and Return-Demonstration for Device Setup
Walk through the full setup first, then let the patient do it. They should complete the setup on their own while you watch, including pairing the device, placing it the right way, and sending the first data point. That return-demonstration step shows whether they can use the device without help.
What you stress during training should match the device type.
| Device Type | Body Placement | Key Metrics | Common Training Errors | Clinician Teaching Emphasis |
|---|---|---|---|---|
| Posture Wearable (e.g., aiSpine) | Upper or mid-back | Spinal alignment, slouching alerts, movement frequency | Incorrect adhesive/clip placement; ignoring alerts | Connect posture alerts to pain reduction and ergonomics |
| Ring-based Wearable (e.g., aiRing) | Finger (index or ring) | Heart rate, sleep quality, activity trends, SpO2 | Improper sizing; forgetting to sync with app | Link activity levels to energy conservation and fatigue |
Connect Device Use to Daily Routines and Patient Needs
Match the onboarding approach to the patient’s access, comfort with tech, and support at home. A wearable has to fit into daily life, or it usually gets left behind. The easiest way to help with consistency is to connect wear time to habits the patient already has.
For example, a patient who works at a desk can check posture feedback during scheduled micro-breaks.
A patient working on sleep and fatigue can put on the ring as part of a morning self-care routine.
If a patient has cognitive or literacy barriers, simplify the app as much as possible and bring in a caregiver when needed. Automated reminders can also help patients stay on track.
| Feature | In-Person Onboarding | Telehealth Onboarding |
|---|---|---|
| Setup Time | 15–20 minutes | 20–40 minutes (includes tech troubleshooting) |
| Patient Support Needs | Hands-on guidance for physical placement | Verbal cues and screen sharing; may need caregiver assistance |
| Clinical Advantage | Immediate verification of device fit and calibration | Observes device use in the patient’s actual home environment |
| Limitations | Requires patient travel to the clinic | Cannot physically assist with hardware pairing or tactile setup |
| Ideal Use Cases | Post-surgical patients; low digital literacy | Homebound patients; rural areas; follow-up adjustments |
Once the patient can handle the device on their own, you can move into adherence checks and safety follow-up.
Support Adherence, Safety, and Clinical Follow-Up After Onboarding
Schedule Early Check-Ins and Address Common Problems
Once the patient can use the wearable on their own, move into the first month of follow-up. Onboarding is just the beginning. The first 30 days often decide whether the patient sticks with the device, so it helps to schedule an early check-in around day 15 and one last troubleshooting touchpoint before the end of the month. Outreach during this window can improve RTM activation and keep data coming in more consistently.
The goal is simple: steady, confirmed use. At the day 15 check-in, stick to the basics. Is the app still logged in? Is the device being charged on a regular basis? Is the sensor in the right spot? Small tech problems like these can disrupt data transmission.
If the patient is still below the monthly data target by day 15, add another touchpoint before day 21 to sort out pairing, charging, or placement issues.
To bill treatment management under CPT 98980, you need at least one live phone or video call each calendar month. Automated messages and portal reminders do not count toward that rule. Put that call into your workflow early so you’re not chasing it at the end of the month.
Teach Patients How to Use Data Safely and When to Escalate
Use these early contacts to standardize your OT RTM process and your documentation. Patients do not need to interpret every single data point. They need enough context to stay involved. A good way to frame the device is as a tool for tracking recovery progress, not as constant surveillance. That keeps attention on function.
Patients should learn to watch for trends over time instead of reacting to one isolated reading. They should also know when to call, such as for worsening pain or a pre-defined change in symptoms. On the clinical side, use incoming RTM data to make clear care changes, like adjusting pacing, updating ergonomic advice, or changing exercise intensity. Then document the link between the data and that decision in the monthly note.
Every data review should lead to a documented care adjustment. Document each check-in so training quality and billing can be tracked in a consistent way.
Measure Quality and Build a Repeatable OT Training Model
Track Documentation, Billing, and Training Quality
After onboarding and the first follow-ups, set one clear process for how every RTM case is documented, billed, and checked. RTM notes should show that the patient used the device the right way and how the patient responded. They also need to explain why RTM was used, what changed, and how those changes affected care.
One simple way to stay organized is to build a monthly review file for each patient. That file should include:
- the order or statement of medical necessity
- the device identity
- a day-count report showing transmission days
- time logs for management
- a summary of the live interaction
Also confirm that the device is FDA-cleared, exportable, and time-stamped.
For 2026, RTM billing is tiered based on device-supply days and management time, so your documentation has to match the right threshold. There’s also a payment rule to watch: when OTAs perform RTM services, codes 98975, 98979, 98980, and 98981 are subject to a 10% de minimis payment reduction under the CO modifier.
Key Takeaways for a Standardized RTM Patient Education Process
Use the same checklist for every patient so training, follow-up, and billing don’t drift from case to case. A repeatable RTM training model usually comes down to a few steady habits.
Start with the right patient. In many cases, that means a Medicare beneficiary with an active therapy plan of care and a musculoskeletal or respiratory condition that calls for therapy outcomes monitoring. Keep instructions plain and centered on what the patient needs to do each day. Before the visit ends, confirm skill through return-demonstration and document that the patient or caregiver acknowledged the training.
For OT, RTM should be treated as "sometimes therapy" by linking it to the plan of care, using the GO modifier, and documenting progress toward functional goals. From there, follow up early, review data on a steady basis, and use a day 15 checkpoint if the patient is trending below the 16-day adherence threshold.
Clinics that want a repeatable workflow can use AIH LLC’s aiSpine, aiRing, and AIH Health App to support onboarding, tracking, and documentation.
FAQs
Which OT patients are the best fit for RTM?
OT patients are a strong fit for RTM when they’re active participants in their care, already have a plan of care in place, and stand to gain from remote support and monitoring.
What must be documented to bill CPT 98975?
Document the RTM device used, confirm that it meets the FDA definition of a medical device, and note the patient or caregiver education and training that was provided. Also record the setup activities completed during the session.
You should also include proof that the patient activated and used the device, along with the date of the setup and education session.
What counts as a live interaction for CPT 98980?
For CPT 98980, a live interaction means at least one real-time, synchronous communication with the patient or caregiver, like a phone call or video visit.
That interaction must last at least 20 minutes.